Control Strip
The Control Strip on the right side combines different functions that are either required globally, or constantly used, and therefore should not be hidden in a menu. Still using the menu entry Window, Hide Control Strip, the Control Strip is shifted out of the visible area to gain more space for other elements.
Device selection. Select the unit to be controlled in case more than one is installed on the computer.
Undo / Redo. With the unlimited Undo and Redo changes of the mix can be undone and redone, at any time. Undo/Redo does not cover graphical changes (window size, position, channels wide/narrow etc.), and also no changes to the Presets. The accidental overwrite of an EQ Preset can not be made undone.
Undo/Redo also operates across Workspaces. Therefore a completely differently set up mixer view can be loaded via Workspace, and with a single click on Undo the previous internal mixer state is returned - but the new mixer view stays.
Global Mute Solo Fader.
Mute. Global Mute operates in a pre fader style, muting all currently activated routings of the channel. As soon as any Mute button is pressed, the Mute Master button lights up in the Control Strip area. With this button all selected mutes can be switched off and on again. One can comfortably set up a mute group or activate and deactivate several mute buttons simultaneously.
Solo. As soon as any Solo button is pressed, the Solo Master button lights up in the Control Strip area. With this button all selected Solos are switched off and on again. Solo operates as Solo-in-Place, post fader style, as known from common mixing desks. A typical limitation for mixing desks, Solo working only globally and only for the Main Out, does not exist in TotalMix. Solo is always activated for the current submix only.
Fader. A Shift-click on a fader adds the fader to the temporary fader group. All faders now marked yellow are ganged, and move simultaneously in a relative way. The temporary fader group is deleted by a click on the F symbol.
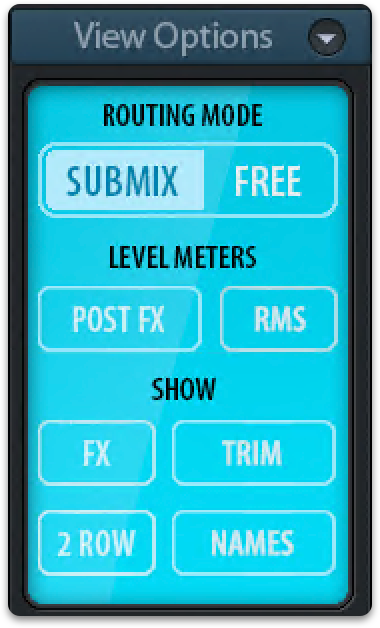
View Options
View Options. This area combines different functions of routing, the level meters and the mixer view.
-
Submix. The Submix view (default) is the preferred view and delivers the quickest overview, operation and understanding of TotalMix. The click on one of the Hardware Output channels selects the respective submix, all other outputs are darkened. At the same time all routing fields are set to this channel. With Submix view, it is very easy to generate a submix for any output: select the output channel, then adjust the fader and pans of first and second row - finished.
-
Free. The Free view is for advanced users. It is used to edit several submixes simultaneously, without the need to change between them. Here one works with the routings fields of the input and playback channels only, which then show different routing destinations.
-
Post FX. This device has no effects processor, therefore the level meters will show the same level regardless of this setting.
-
RMS. The numerical level display in the channels displays peak or RMS.
-
FX. Opens the window to set up the effects Reverb and Echo.
-
Trim. Activates all Trim buttons on all channels. TotalMix thus behaves like a conventional, simple mixing desk. Each fader affects all active routings of the channel simultaneously, as if the fader were a trim-pot in the hardware input.
-
2 Row. Switches the mixer view to 2 rows. Hardware Inputs and Software Playbacks are placed side by side. This view saves a lot of space, especially in height.
-
Names. Display of the original names of channels when they had been renamed by the user.
Snapshots
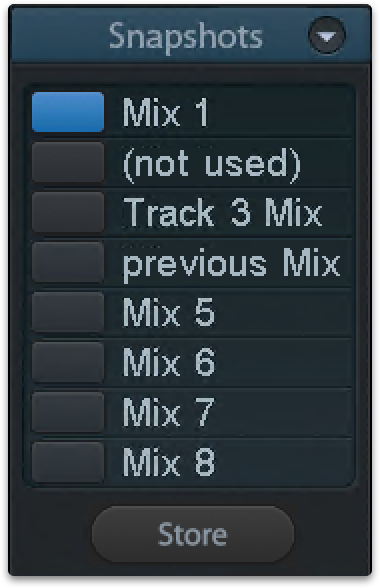 Snapshots include all mixer settings, but no graphical elements like window positions, window size, number of windows, visible EQs or Settings, scroll states, Presets etc. Only the state wide/narrow of the channels is registered. Moreover the Snapshot is only temporarily stored. Loading a Workspace causes the loss of all stored Snapshots, when these all had not been saved before in a Workspace, or separately via File / Save Snapshot as. Via File / Load Snapshot the mixer states can be loaded individually.
Eight different mixes can be stored under individual names in the Snapshot section. A click on any of the 8 buttons loads the corresponding Snapshot. A double click on the name field opens the dialog Input Name to edit the name. As soon as the mixer state is changed the button starts flashing. A click on Store lets all buttons flash, whereby the last loaded one, the base of the current state, flashes inversely. The storage finishes by clicking the desired button (means storage place). The storage process is exited by another click on the flashing Store button.
The area Snapshots can be minimized by a click on the arrow in the title bar.
Groups
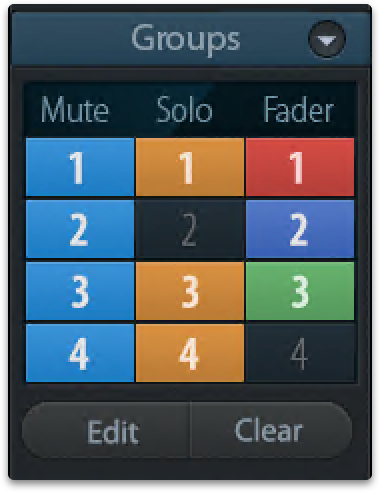
The area Groups provides 4 storage places each for fader, mute and solo groups. The groups are valid per Workspace, being active and usable in all 8 Snapshots. But with this they are also lost when loading a new workspace, in case they have not been saved before in a different Workspace.
Note: The Undo function will help in case of an accidental overwrite or deletion of the groups.
TotalMix uses flashing signals to guide you through the group setup. After a click on Edit and click on the desired storage place all desired functions for this group have to be activated or selected. The storage process is finished by another click on Edit.
When setting up a fader group make sure to not add faders that are at the top or low position, except all faders of that group have this position.
The Mute groups operate - other than the global mute - exclusively for the current routing. This way you can not mute signals on all outputs unintentionally. Instead signals can be muted on specific submixes by the push of a button.
A solo group operates exactly like the global solo, signals outside the current routing are not affected.
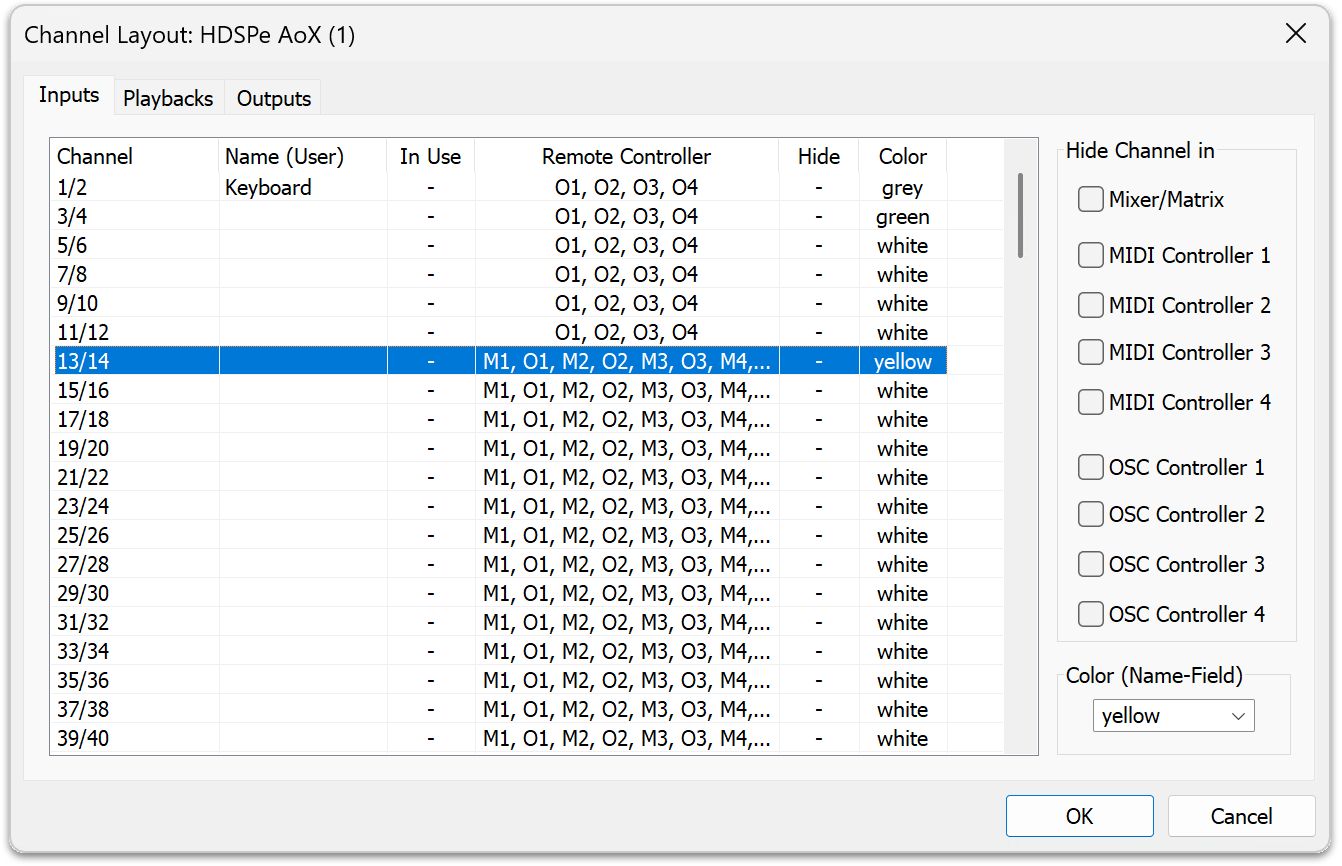
Layout Presets
To maintain overview within TotalMix FX channels can be hidden. Channels can also be excluded from being remote controlled. Under Options / Channel Layout a dialog lists all I/Os with their current state. Selecting one or several channels enables the options to the right:
-
Hide Channel in Mixer/Matrix. The selected channels are no longer shown in TotalMix FX, nor are they available via MIDI or OSC remote control.
-
Hide Channel in MIDI Remote 1-4. The selected channels are hidden for MIDI remote (CC and Mackie Protocol).
-
Hide Channel in OSC Remote 1-4. The selected channels are hidden for OSC remote control.
Hidden channels in Mixer/Matrix are still fully functional. An existing routing/mixing/FX processing stays active. But as the channel is no longer visible it can not be edited anymore. At the same time the hidden channels are removed from the list of remote controllable channels, to prevent them from being edited unnoticed.
Hidden channels in MIDI Remote x are removed from the list of remote controllable channels. Within an 8-channel block of a Mackie compatible control they are skipped. The control therefore is no longer bound to consecutive orders. For example it will control channels 1, 2, and 6 to 11, when channels 3 to 5 are hidden.
 The same can be done for OSC. With unnecessary channels made invisible for the OSC remote the more important channels are available as one block on the remote.
The dialog can be called directly from TotalMix by a right mouse click on any channel. The corresponding channel will then be preselected in the dialog.
Rows Inputs, Playbacks and Outputs are set up individually by the tabs at the top. In Use shows which channels are currently used in the mixing process.
In the above example the Phones playback channel has been made invisible. When the Phones output is not used this is an easy way to remove it from the mixer completely. A more complex setup would be to only show all channels of the drum section, the horn section or the violins.
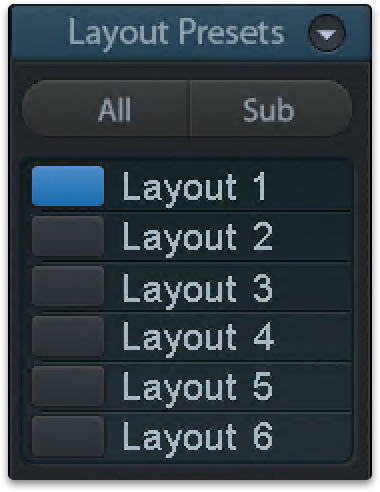 After finishing those settings the whole state can be stored as Layout Preset. A click on Store and the desired memory slot makes the current channel layout recallable anytime. The button All makes all channels temporarily visible again.
With a simple click on a button it will then be possible to easily switch views of only the channels involved with the mixing of the drum section, the horn section, the violins, or any other useful view. An optimized remote layout can be activated here as well, with or without visible changes. Double-click the default slot name to enter any other name.
Layout Presets are stored within the Workspace, so make sure to save the current state before loading a different Workspace!
The button Sub activates another useful special view. When in Submix view, Sub will cause all channels to disappear that are not part of the currently selected Submix/Hardware Output. Sub temporarily shows the mix based on all channels from Inputs and Playback row, independent from the current Layout Preset. That makes it very easy to see and to verify which channels are mixed/routed to the current output. Sub makes checking and verifying of mixes, but also the mix editing itself, a lot easier, and maintains perfect overview even with lots of channels.
Scroll Location Markers
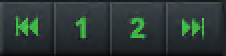
Another feature to improve overview and working with TotalMix FX are scroll location markers (TotalMix view only). These are displayed automatically when the horizontal size of the TotalMix FX window is smaller than the channel display requires. Shown on the right side of the scrollbar of each row they have four elements:
-
Arrow to the left. A left mouse click let the channels scroll to the very first one, or most left.
-
Marker number 1. Scroll to the desired position and perform a right mouse click on 1. A dialog comes up with precise information. Once stored, a left mouse click will scroll the channels to the stored position.
-
Marker number 2. See above.
-
Arrow to the right. A left mouse click let the channels scroll the last one, or most right.
Scroll location markers are stored in the Workspace.
-
When the TotalMix FX window is intentionally made small in width, so only a few channels are shown.
-
When the available screenspace is not sufficient to show all channels.
-
When some or all EQ or Dynamics panels are open. Then all relevant settings are always visible, but require a lot of space horizontally.