Remote Control Overview
The 12Mic-D can be remote controlled. Remote control is activated by default and is not affected by preset changes or device lock.
| The remote control protocols are not protected against malicious use. When activated, the remote control server allows anyone on the network to make changes to the configuration of the device. To limit access, secure the network that the device is connected to. |
Finding the Device on a Network
The 12Mic-D has three integrated network adapters (USB 2.0 and dual ethernet).
The adapters can be used, individually or simultaneously, to control the device with HTTP ("web remote"). The web remote control works on any IP-based network, including wireless networks.
-
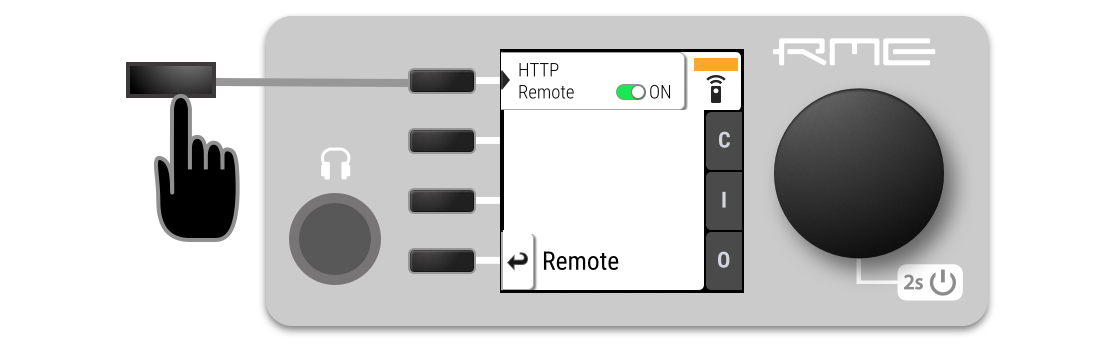
Open the remote tab in the STATE section. To enter the State section press the encoder twice while in the main screen, then select the remote tab.
-
Ensure that the HTTP Remote setting is switched to
 ON.
ON.
USB
When the device is connected with a USB 2.0 cable to a Apple macOS™ or Microsoft Windows™ computer, a network device is automatically installed in the background that assigns the 12Mic-D the following IP address:
| Only one of the following products can be connected to the host computer via USB at a time: RME M-32 AD Pro (II, II-D), M-32 DA Pro (II, II-D), 12Mic, 12Mic-D, AVB Tool, M-1610 Pro, M-1620 Pro (D). |
Ethernet
After connecting the primary or secondary port of the 12Mic-D to a network, an IP address will be automatically assigned by a DHCP server that is present on that network. If there is no DHCP server on the network, the device assigns itself a link local address (in the 169.254.0.0/16 subnet) that can be used to connect to the device.
-
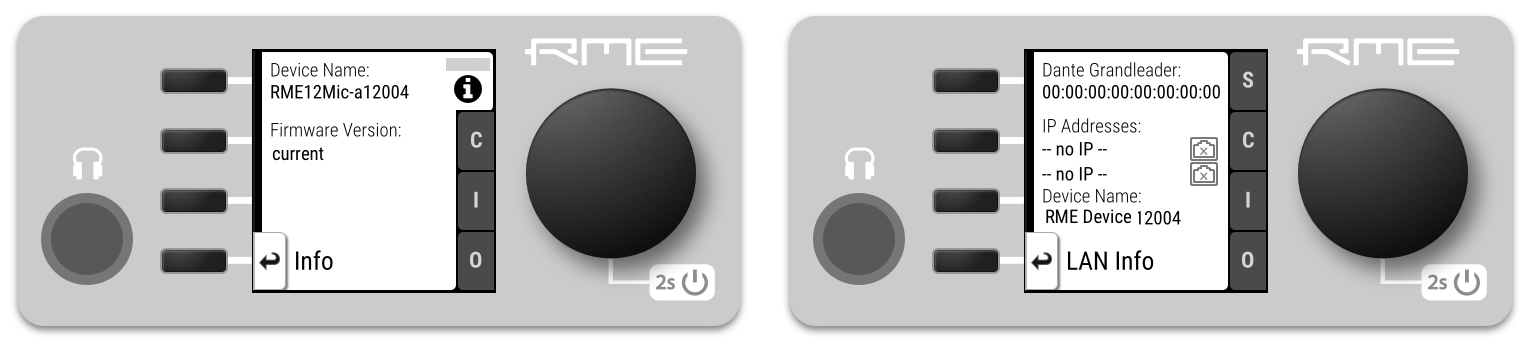
While the device shows the default screen with level meters, press the button i as in 'Info'.
-
Proceed to "LAN info"
-
The IP address is displayed.
Connecting to the Remote Interface without IP address
Instead of using the IP address, the device name can be entered in the browser window, followed by .local/.
The current device name is shown on the Info ⇒ LAN Info screen and also in the main menu, STATE section, System Information.
By default, the device name is unique and can be seen in the Dante® Controller. A resulting URL will look similar to:
| The device name can be changed with the Dante Controller. It is limited to 32 characters and must not begin or end with a hyphen ("-"). |
| on some operating systems or browsers, a trailing dot "." may be required after the 'local' domain: http://RME12MIC-D65432.local./ |
Assigning a Static IP Address
A static IP address can be assigned for each network port. Other devices with IP addresses in the same subnet can then reach the 12Mic-D using a fixed IP address.
| The static IP address configuration is persistent and does not get deleted when a preset (or factory preset) is loaded. |
-
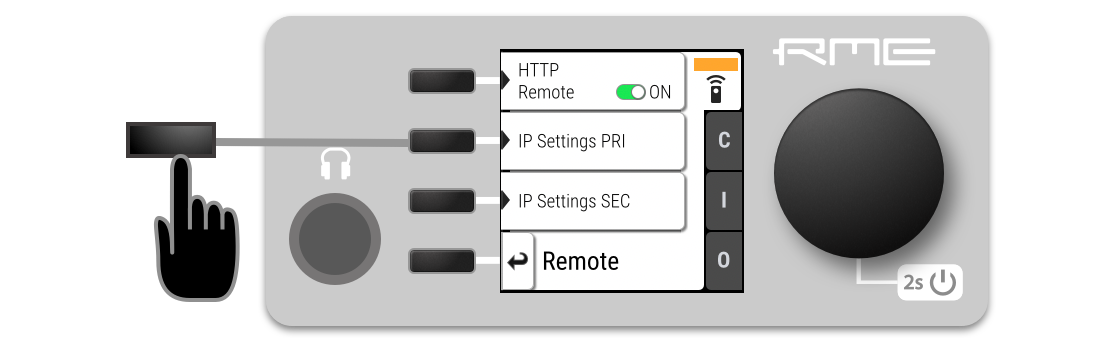
Open the Remote tab in the STATE section of the main menu.
-
Open IP Settings. The current IP configuration is shown.
-
Select IP Settings PRI or IP Settings SEC depending on which interface should be configured. The IP address on the secondary interface can only be assigned if the device has been configured to redundancy mode.
-
Select Change IP Settings.
-
Toggle Mode to
Static.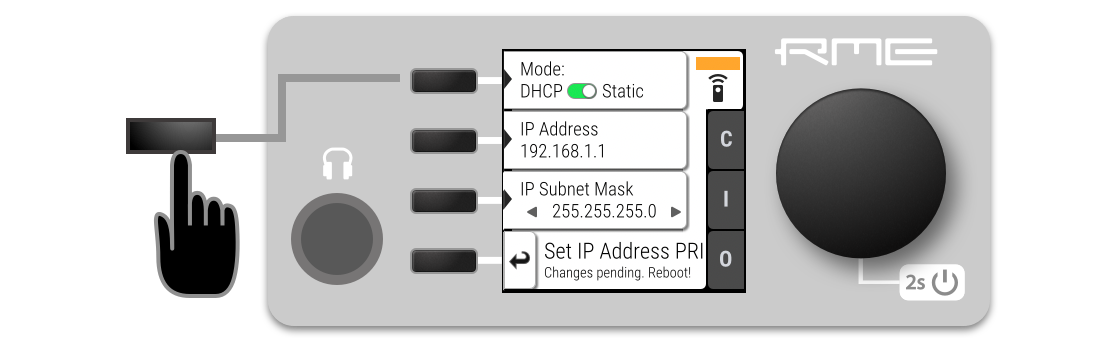
-
Set IP Address and subnet mask using buttons and encoder.
-
Power the device off and on in order for the new IP address to be applied.
Web Remote
An integrated web server provides an easy-to-use remote control interface for the 12Mic-D. It requires a network connection from a desktop or tablet computer with a current browser version.
-
Chrome 127
-
Firefox 127
-
Edge 127
-
Safari 17.0
or newer with support for WebGL.
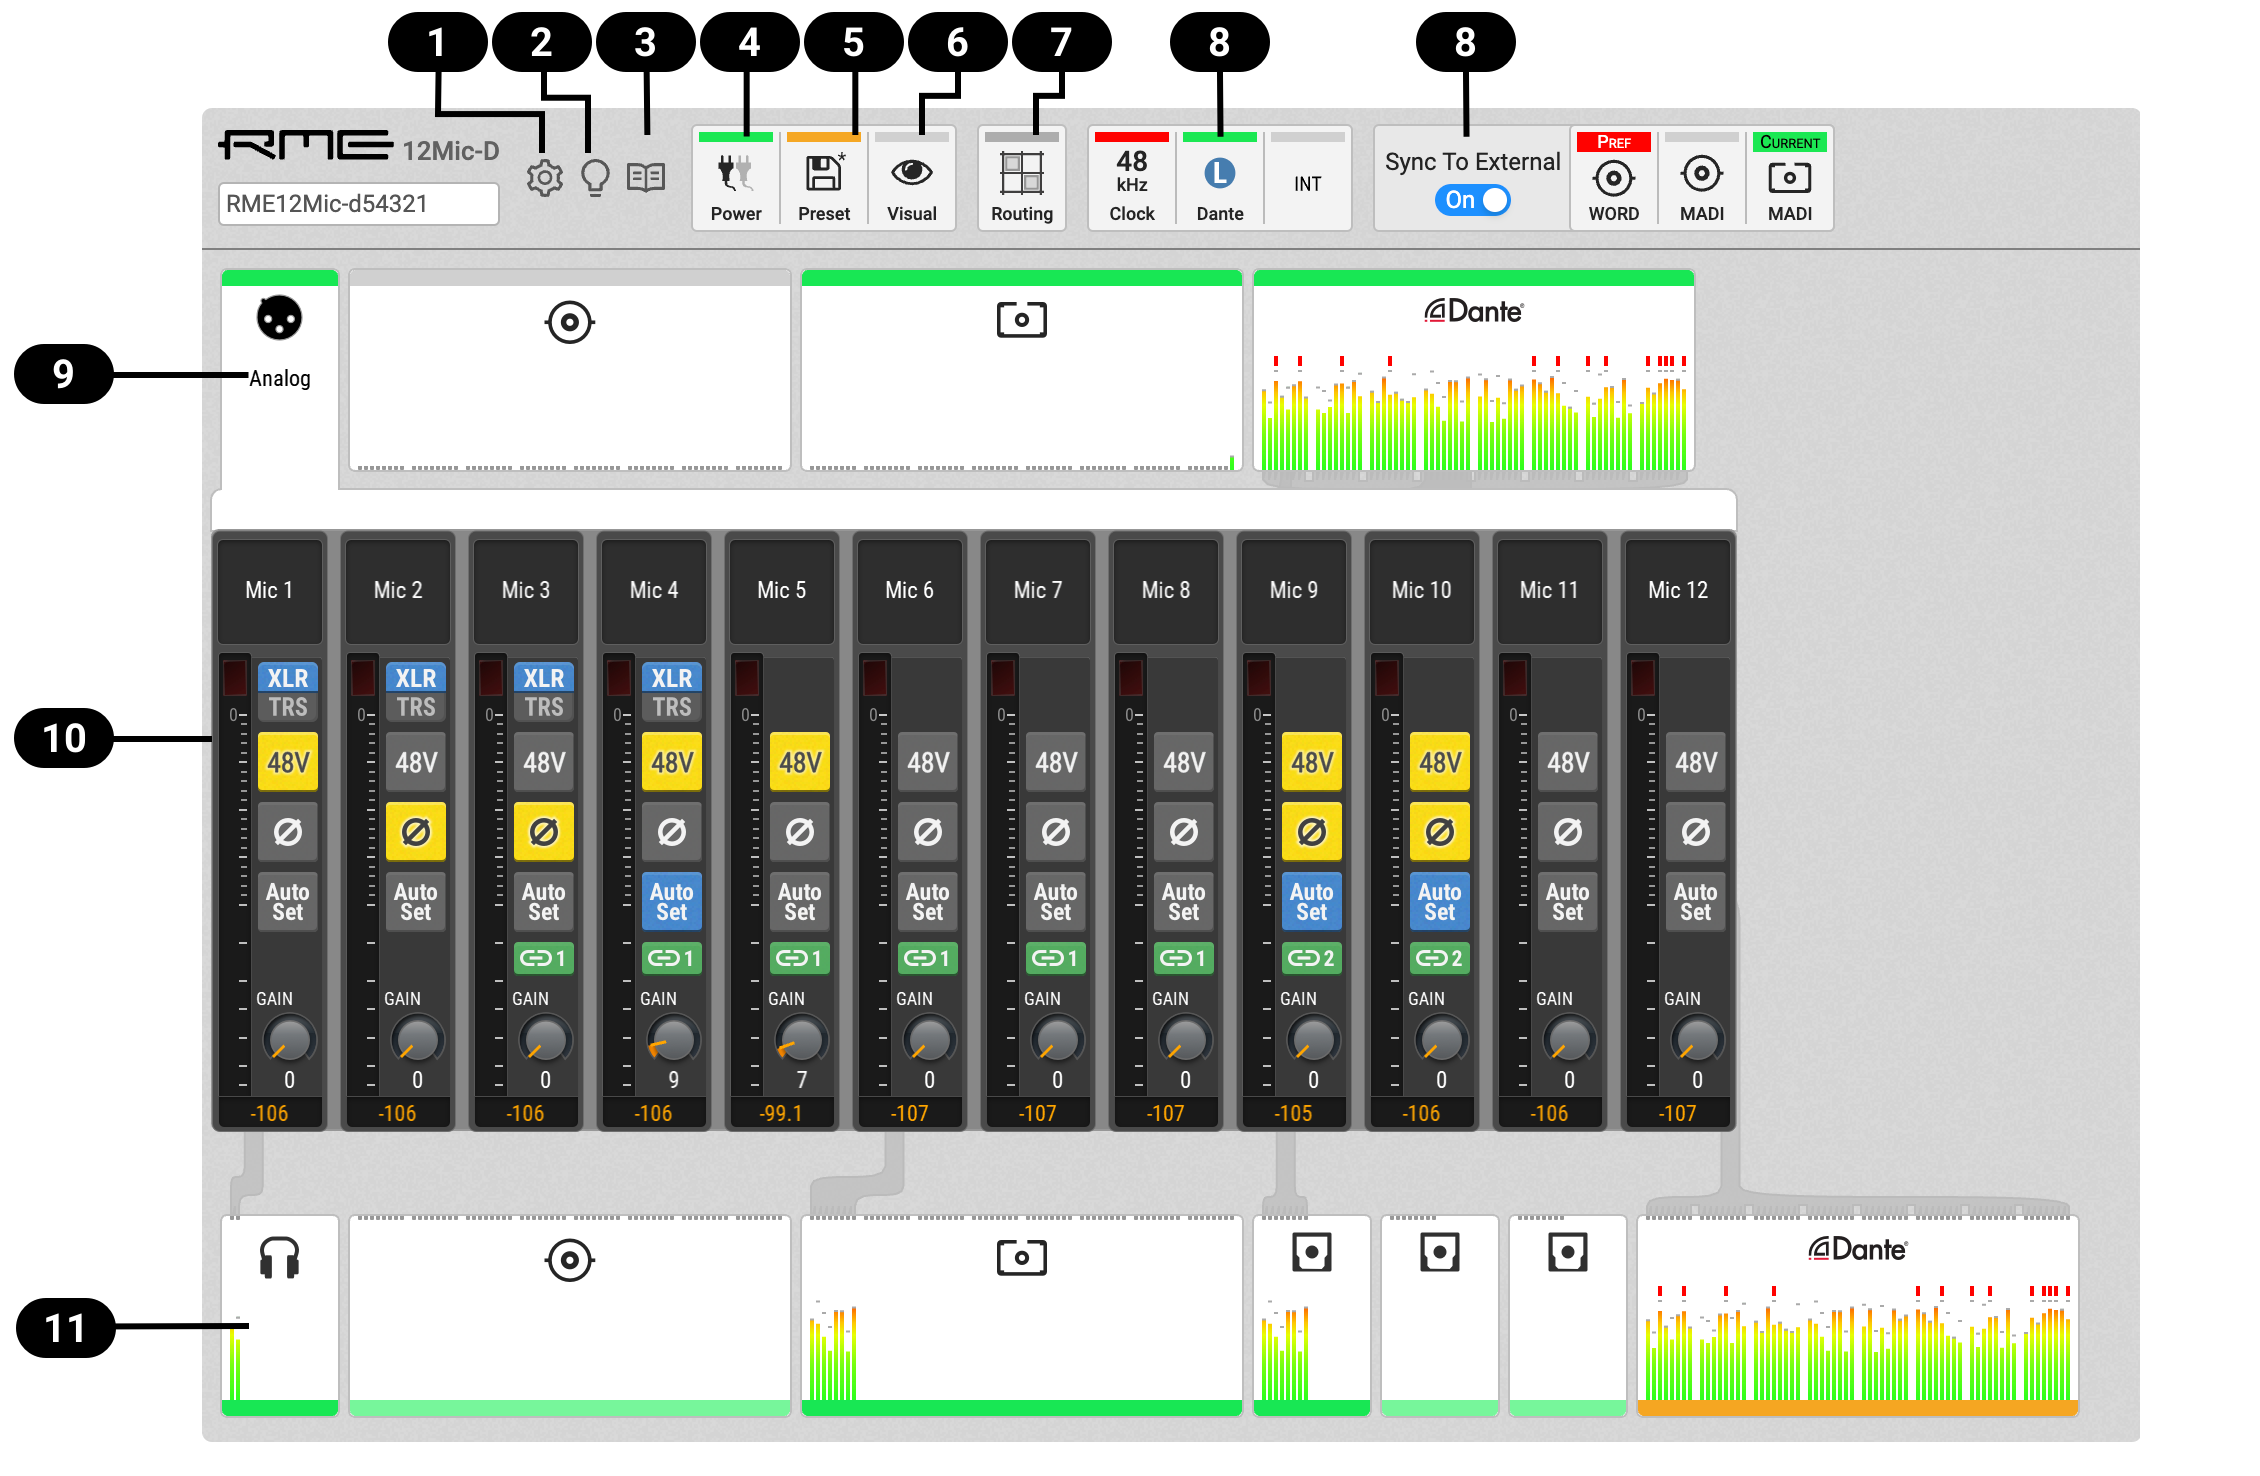
Web Remote Overview
|
|
|
|
|
Link to web manual |
|
|
|
|
|
|
|
|
|
|
|
|
|
|
|


JSON(OSC) Remote Control
The 12Mic-D can be remote controlled with HTTP POST requests. Each request carries a data payload that contains a JSON object modeled after the open sound control (OSC) protocol.
For example, if the device is connected to a computer that can run cURL in a terminal application (Microsoft Windows™ PowerShell or Apple macOS™ Terminal), the following command will request the entire device schema as a JSON object:
curl --header "Content-Type: application/json" --request POST --data '{"osc":{"schema":null}}' RME12MIC-D65432.local/api/v2/self
{
    "osc": {
        "schema": {
            "osc": {
                "version": null,
                "schema": []
            },
            "device": {
                "entity_id": null,
                "entity_model_id": null,
                "entity_capabilities": null,
                "entity_name": null,
                "vendor_name": null, (1)
                "model_name": null,
                "firmware_version": null,
                "group_name": null,
[... continues]| 1 | "vendor_name" Object |
This schema can then be used to identify the possible parameters, for example the vendor name. Sending an empty value null triggers a response with the current value of the requested object.
| The first two levels of the schema ({"osc": {"schema": {…}}}) must be omitted. Only the encapsulated objects (device, input, output, routing etc.) are used. |
To request the "vendor_name" object of the connected device, we run the following command. It is here outlined in more detail.
curl \  (1)
 --header "Content-Type: application/json" \ (2)
 --request POST \ (3)
 --data '{"device": {"vendor_name": null }}' \ (4)
RME12MIC-D65432.local/api/v2/self (5)| 1 | cURL command to send an HTTP POST request |
| 2 | header: application/json |
| 3 | request type "POST" |
| 4 | JSON object sent to the device, 'null' to get current value |
| 5 | URL or IP of the device on the network with path to API |
Executing this command delivers the expected result:
{"device":{"vendor_name":"RME Audio"}}
| The entire web remote application is based on this protocol. It is therefore possible to read the data payloads sent to the device when interacting with the web remote by using the "Network"-tab of the developer tools inside the browser. |
All device values must be polled by sending the corresponding JSON objects. It is possible to poll or set several values at once in a single object:
--data '{"input":{"analog":{"1":{"phase":true},"2":{"phase":true},"3":{"phase":true},"4":{"phase":true}}}}'
JSON(OSC) Implementation Chart
/osc/schema
TX: {"osc": {"schema": null}}
RX: {"osc": {"schema": {[...]}}}
Retrieves the entire device schema, which can then be used to poll all current values from the device by stripping the outer {"osc": {"schema":{ and }}}.
/device
Objects that reflect or affect the overall device state except clock, I/O and routing.
/device/entity_model_id
TX: {"device": {"entity_id": null}}
RX: {"device": {"entity_id": "0x480bb2fffed70300"}}
Returns a unique EUI-64 as the devices Entity Model ID as a string.
/device/entity_name
TX: {"device": {"device_name": null}}
RX: {"device": {"device_name": "12Mic-D"}}
Retrieve the current device name.
/device/vendor_name and /device/model_name
TX: {"device": {"vendor_name":null,"model_name":null}}
RX: {"device": {"vendor_name":"RME Audio","model_name":"12Mic-D"}}
Retrieve vendor and product name.
/device/firmware_version
TX: {"device": {"firmware_version":null}}
RX: {"device": {"firmware_version":"1.3.3"}}
Shows the firmware version currently installed on the device.
/device/psu/state
TX: {"device": {"psu": {"state": null}}}
RX: {"device": {"psu": {"state": [true, true]}}}
Returns the state of the internal power supplies.
/device/psu/redundancy_alert
TX: {"device": {"psu": {"state": null}}}
RX: {"device": {"psu": {"state": false}}}
TX: {"device": {"psu": {"state": true}}}
If the value is set to true, the device signals a warning when one of the power supplies does not operate. This is then reflected in the following object
RX: {"device": {"psu": {"soundness": {"state": "Good"}}}}
/device/levelmeters
TX: {"device": {"levelmeters": {"mode": null}}} (1)
RX: {"device": {"levelmeters": {"mode": "rms"}}} (2)
TX: {"device": {"levelmeters": {"mode": "peak"}}} (3)| 1 | Request current levelmeter display value |
| 2 | Response: current value is "rms" |
| 3 | Set the levelmeter mode to "peak" |
TX: {"device": {"levelmeters": {"over_hold": null}}} (1)
RX: {"device": {"levelmeters": {"over_hold": "off"}}} (2)
TX: {"device": {"levelmeters": {"over_hold": "auto"}}} (3)| 1 | Request status of continuous clipping notification |
| 2 | Response: current value is "off" |
| 3 | Hold clip events (valid values: "on", "auto" reset, "off") |
TX: {"device": {"levelmeters": {"over_reset": true}}} (1)| 1 | If the clip events are currently displayed continuously, reset the notification for all channels. |
/device/dark_mode
TX: {"device": {"dark_mode": {"display": null}}} (1)
RX: {"device": {"dark_mode": {"display": false}}} (2)
TX: {"device": {"dark_mode": {"display": true}}} (3)| 1 | Request status of display dark mode |
| 2 | Response: the display is currently on, dark mode is off. |
| 3 | Set the dark mode for the display to "true" |
TX: {"device": {"dark_mode": {"power_led": null}}} (1)
RX: {"device": {"dark_mode": {"power_led": false}}} (2)
TX: {"device": {"dark_mode": {"power_led": true}}} (3)| 1 | Request status of power LED dark mode |
| 2 | Response: the LED is on, dark mode is off. |
| 3 | Turn off the LED. |
TX: {"device": {"dark_mode": {"levelmeter_leds": null}}} (1)
RX: {"device": {"dark_mode": {"levelmeter_leds": "on"}}} (2)
TX: {"device": {"dark_mode": {"levelmeter_leds": "dim"}}} (3)| 1 | Request status of the front panel level meter LEDs |
| 2 | Response: the LEDs are on, dark mode is off |
| 3 | "dim" or turn "off" the level meter LEDs |
TX: {"device": {"dark_mode": {"soundness": null}}} (1)
RX: {"device": {"dark_mode": {"soundness": "Inactive"}}}| 1 | Request whether any of the preceding settings is set to true or "off" |
| The Soundness is set to "Caution" when /dark_mode/display or /dark_mode/power_led are set to true, or if /dark_mode/levelmeter_leds is set to "off". |
/device/preset
TX: {"device": {"preset": {"active": null}}} (1)
RX: {"device": {"preset": {"active": 0}}} (2)| 1 | Request current preset |
| 2 | Response: current preset is unsaved (0), or one of presets 1-16 |
TX: {"device": {"preset": {"loaded": null}}} (1)
RX: {"device": {"preset": {"loaded": 16}}} (2)| 1 | Request last loaded preset |
| 2 | Response: current state is based on preset 16 (or 1-15) |
TX: {"device": {"preset": {"soundness": null}}} (1)
RX: {"device": {"preset": {"soundness": {"state": "Notice","cause": "PresetChanged"}}}} (2)| 1 | Request preset soundness |
| 2 | Response: Notice: current preset was changed |
TX: {"device": {"preset": {"save": 4}}} (1)
RX: {"device": {"preset": {"save": 4}}} (2)| 1 | Store current device state into Preset 4 (or 1..15) |
| 2 | Response: 200 OK, current state stored |
TX: {"device":{"preset":{"recall": 5}}} (1)
RX: {"device":{"preset":{"recall": 0}}} (2)| 1 | Load preset 5 (or 1..16, 16 represents factory preset) |
| 2 | Response: 200 OK, preset loaded |
/clock
/clock/sampling_rate
TX: {"clock": {"sampling_rate": null}} (1)
RX: {"clock": {"sampling_rate": 44100}} (2)| 1 | Request sampling rate set by the user |
| 2 | Response in hertz |
/clock/word_clock_single_speed
TX: {"clock": {"word_clock_single_speed": null}} (1)
RX: {"clock": {"word_clock_single_speed": false}} (2)
TX: {"clock": {"word_clock_single_speed": true}} (3)| 1 | Request word clock single speed status |
| 2 | Response (boolean) |
| 3 | Set word clock output to single speed |
/clock/source
TX: {"clock": {"source": null}} (1)
RX: {"clock": {"source": "internal"}} (2)
TX: {"clock": {"source": "wordclock"}} (3)| 1 | Request preferred external clock source requested by user |
| 2 | Response: device is master |
| 3 | Set preferred external clock source to word clock |
/clock/reference_clock
TX: {"clock": {"reference_clock": null}} (1)
RX: {"clock": {"reference_clock": "madi_coaxial"}} (2)| 1 | Request the current clock reference |
| 2 | Response |
/clock/sync_to_external
TX: {"clock": {"sync_to_external": null}} (1)
RX: {"clock": {"sync_to_external": }} (2)| 1 | Request state of sync to external |
| 2 | Response (boolean) |
/clock/preferred_leader
TX: {"clock": {"preferred_leader": null}} (1)
RX: {"clock": {"preferred_leader": }} (2)| 1 | Request whether the device is preferred leader |
| 2 | Response (boolean) |
/clock/dante_clock_status
TX: {"clock": {"dante_clock_status": null}} (1)
RX: {"clock": {"dante_clock_status":
      {"is_leader":true,"ptp_grandleader":[72,0,1,255,254,2,3,4]}}}} (2)
}| 1 | Request current Dante clock status |
| 2 | Response: leader, and grandleader EUI-64 |
/clock/soundness
TX: {"clock": {"soundness": null}} (1)
RX: {"clock": {"soundness": {"state": "Good"}}} (2)
RX: {"clock": {"soundness": {"state":"Warning","cause":"ClockMasterNoSync"}}} (3)| 1 | Request the overall soundness state of the clock section. |
| 2 | Everything is properly synced. |
| 3 | The external clock preference is not in sync. |
/clock/sources/(source)
dante
internal
wordclock
madi_coaxial
madi_optical
Each source contains an object with three keys rate, sync and soundness that must be polled individually.
TX: {"clock": {"sources": {"dante": { "rate": null, "sync": null, "soundness": null }}}}
RX:
  {"dante":
    {
      "rate":48000, (1)
      "sync":true, (2)
      "soundness":{"state":"Good"} (3)
    }
}| 1 | /rate Current sampling rate at input |
| 2 | /sync Sync status |
| 3 | /soundness Soundness |
TX: {"clock": {"sources": {"madi_coaxial": {"rate": null}}}} (1)
RX: {"clock": {"sources": {"madi_coaxial": {"rate": 44100}}}} (2)| 1 | Request the sampling rate at input MADI coaxial |
| 2 | Current sampling rate is 44.1 kHz |
/input
Shows relevant settings for the input channels.
/input/analog/[number]
Analog input settings. Each individual setting can be polled with null:
TX: {"input": {"analog": {"4": {"p48": null}}}}
RX: "input":{
      "analog": {
        "1": {
          "type": "combo", (1)
          "p48": false, (2)
          "phase": true, (3)
          "trs": false, (4)
          "hiz": false, (5)
          "gain": 0, (6)
          "gain_group": 0, (7)
          "gain_autoset":true, (8)
          "label": "Mic 1" (9)
}}}| 1 | Type of jack, XLR or TRS/XLR (combo) |
| 2 | Phantom power |
| 3 | Phase switch |
| 4 | (in case of combo jack) TRS active |
| 5 | (in case of combo jack) Hi-Z active |
| 6 | Current gain in dB |
| 7 | Current gain group |
| 8 | AutoSet setting |
| 9 | Channel label |
/input/madi
State and settings of the MADI inputs (apart from /clock/sources/madi_…)
RX: {"input": {
      "madi": {
        "auto_input": false, (1)
        "coaxial": {
          "soundness": {
            "state": "Good" (2)
          }
        },
        "optical": {
          "soundness": {
            "state": "Inactive" (3)
          }
        }
}}}| 1 | Auto input (Redundancy) for MADI inputs |
| 2 | Soundness of MADI coaxial input |
| 3 | Soundness of MADI optical input |
The auto input can be activated or deactivated with a boolean:
TX: {"input": {"madi": {"auto_input": true}}}
/output
/output/phones
Settings for the frontpanel headphone port:
{"output":{
  "phones": {
      "soundness": { (1)
          "state": "Unrouted"
      },
      "1": { (2)
          "gain": -126.5, (3)
          "mute": false (4)
      },
      "2": {
          "gain": -126.5,
          "mute": false,
          "mode": "linked" (5)
      }
}}}| 1 | TX: none, RX: soundness of phones out |
| 2 | 1 = Left, 2 = Right |
| 3 | Current gain (TX: null, -126.5 - 0) |
| 4 | Output mute state (TX: null, true, false) |
| 5 | Output mode balanced, linked or independent |
/routing
All output channels are represented as keys within 'port' objects. Routings are created by adding a value ["inputport", channelnumber] to the output channel.
"routing": {
    "madi_coaxial": (1)
        {"1": (2)
          [
            "dante", (3)
            1 (4)
          ]
        },
}| 1 | TX: phones, (analog), madi_coaxial, madi_optical, dante |
| 2 | TX: 1-64: channel number of output in current port |
| 3 | TX/RX: null, port as above |
| 4 | TX/RX: input channel number |